Diving into Lighting & Portraiture
OK, so I really love photography. I loved it as a child, and as a teenager I loved my high school photography class. We learned to shoot with simple full-manual SLR cameras and then develop black and white film in darkrooms. I even had a darkroom in my parents’ basement. Somehow I “lost” the hobby for twenty years, and only came back to it in my 30’s when I suddenly felt compelled to take decent pictures of my toddling kids. From there, it’s been back down the slippery slope; the basic theory hasn’t changed and all the math-y algorithms still work for me, but now the equipment is just way more fun!
In retrospect, one of the reasons this hobby works so well for me is that I can seamlessly incorporate it into my daily life with kids; the camera comes with on trips, walks to the park, etc. My former pseudocareer — composing music for theater — required hours of unbroken solitude in the music studio. Until my kids get (much) older, I don’t have that level of free time anymore. So I’ve gravitated toward another hobby that dances around the delicious conflict between art and science (exactly as music composition does): you can’t do photography well without really understanding the science and tech, but it’s also worthless without some sort of passion/vision to inspire your creations. The challenge is to balance these two.
So as a birthday present from Frances, I signed up for a one day, 7 hour class on “Lighting and Portraiture” at the local Calumet store in Chicago. Here was a chance to learn a touch more science, and a whole lot more artistic technique around portraiture, which is where my main interest lies. The class was taught by Bill Skinner, a guy with 25 years of insane wedding-photography experience and a sense of humor to prove it. He’s one step away from a standup comic, a great teacher who listens and really makes sure people are following him. I enjoyed him so much that I may sign up for his repeating classes. If you live in Chicago and want to learn photography, TAKE THIS CLASS!
Bill had two basic theses for his class:
- If you’re serious about photography, you need to be thinking about light all the time. You need to be aware of it, shape it, sculpt it, and make it a deliberate part of your composition process. Photography is about painting light, and so you need to think of light as your main medium, not something that accidentally happens.
- Modern cameras and flashes make automatic guesses about everything: color balance, proper exposure, focus. For any random scenario in which you click the shutter, it makes these guesses accurately about 80% of the time. That may be fine if you’re throwing spaghetti at the wall (taking hundreds of near-identical photos) and you’re using trial and error to see what “sticks”. But serious photography is about remaining in control of all the variables, not throwing the dice and hoping it usually works. You should get exactly what you want 100% of the time by NOT TRUSTING the camera and making these decisions on your own, for each and every picture you take. Just as a painter doesn’t use brushes that are “close” and hope for the best, and a photographer doesn’t trust a machine to make close guesses on his/her behalf. Be in control.
We spent a while talking about color temperatures, quality and quantity of light, and how to control flashes properly. We learned about reflective vs. incident metering. We learned about different tools for manipulating light, and we even had a model show up for live demos. Bill started by taking us outside and showing us the model’s face under direct, harsh sunlight. Definitely a case of “raccoon eyes”:
 |
| From Lighting and Portraiture Class |
Then he held a nice diffuser-disc over her head to demonstrate how much better it was with the light spread out over her face:
 |
| From Lighting and Portraiture Class |
We then went to shady areas, which gave us the same diffuse light. And practiced reflecting light from the disc back up into her face:
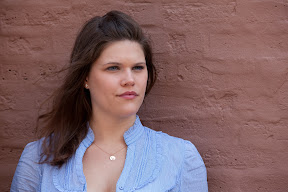 |
| From Lighting and Portraiture Class |
 |
| From Lighting and Portraiture Class |
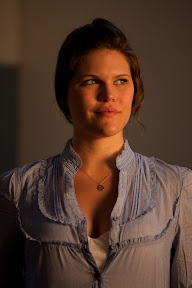
Though my favorite was using the gold reflector. When combined with the warm background, it really made her skin-tone glow:
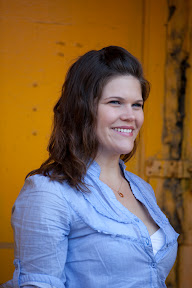 |
| From Lighting and Portraiture Class |
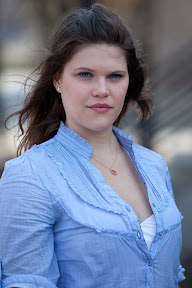
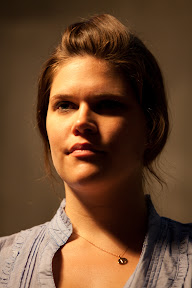
And then a shot from the side, in partial sun and shade. Proof that with a light meter, you can properly expose someone even when they’re mostly backlit:
 |
| From Lighting and Portraiture Class |
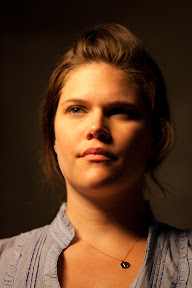
Then we went indoors, where Bill demonstrated oodles of fancy lighting equipment (“monolights” and various hood attachments.) I especially liked the affect of partially lighting her face, but then shooting a narrow beam against the back of her head, just to light up her left cheek:
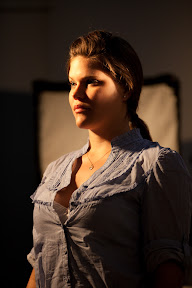 |
| From Lighting and Portraiture Class |
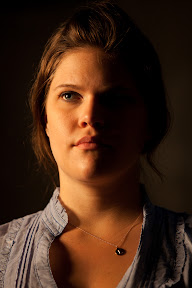
And here’s an example of simulated cloudy window light, using a “soft box”:
 |
| From Lighting and Portraiture Class |
Finally, we talked about the four different ways of lighting a face. Woo, new vocabulary!
 |
| Split lighting: half of face is light, half is dark. |
 |
| Rembrandt lighting: light is 45 degrees both above and to the side of the face, causing the signature triangle of light underneath the darker eye. |
 |
| Loop lighting: Light is 30 degrees both above and to the side of the face, allowing light to break into the darker half, in a loop around the mouth. |
 |
| Butterfly lighting: Light is straight into face from above. |
We also talked quite a bit about which angle to shoot a face from: “broad” means to shoot mainly the lit half of the face (to make the face seem larger/wider), and “short” is about shooting the darker side, which has a slimming effect. We spent quite a while talking about general body posing techniques too, and the various flattering effects they could have.
So aside from all this new knowledge about lighting tools, lighting positions, posing techniques, flash operations, here are the main behavioral takeaways for me:
- I should stop trusting my camera’s light meter and use a real handheld light meter. Reflected light is not nearly as accurate as incidental light, and a real light meter doesn’t do stupid things like try to force every picture to be 18% gray on average, or accidentally meter the wrong part of the image.
- I’m going to stop using a gray card to do color-balancing and use an ExpoDisc instead. Why? The ExpoDisc has two distinct advantages over the gray card: 1. While both techniques require me to take an extra color-calibration photo before I begin shooting, the ExpoDisc requires no further post-processing on the computer. 2. The gray card is reflected light, which can vary based on angle; the ExpoDisc reads the incidental light directly.
- Instead of putting my flash on automatic, dialing a shutter speed and f-stop and hoping for the best, I’m going to use the flash on manual mode now. I know its Guidance Number now (140 at 50mm-zoom), so I can compute in my head exactly where I need to stand and how to set my f-stop to get the perfect flash exposure of the subject. I can set my shutter speed as an afterthought, depending on how much I want to expose the background. (At last, I have a 3-bits” explanation of how to remain in total control of a flash!)
Bill says he’s going to be offering a followup course where we get to do some hands-on practicing of these techniques. That should be really fun.